
Creating Sponsored Brands Ads within Amazon Marketing Services

UPDATE: On September 5, 2018, Amazon consolidated all of its advertising offerings into a single program. In addition to the consolidation under the Amazon Advertising umbrella, the “Headline Search Ads” program title was changed to “Sponsored Brands Ads.”
Banner ads are nothing new to the internet. We’ve all been inundated by them for most of our digital lives. But there’s something different—even refreshing—about the banner ads on Amazon. They seem to rise to the top of the noise and commotion upon arriving at a search engine results page. These ads are officially known as Sponsored Brands Ads and they are available through Amazon Marketing Services. The ads are simple. They contain just a few words and images to persuade a shopper to click. In this post, I’ll be discussing what Amazon Marketing Services is, how to create Sponsored Brands Ads, and how effective they are compared to traditional Amazon Sponsored Products Ads.
What Is Amazon Marketing Services?
Amazon Marketing Services (AMS) is Amazon’s product promotion service that enables merchants and vendors to create targeted advertisements for their products. The services offered by AMS are:
- Amazon Pages
- Sponsored Brands Ads
- Sponsored Products Ads
How to Sign Up for AMS
Only approved Amazon accounts are eligible for AMS. You need one of these five credentials to gain access:
- A Vendor Central login
- An Advantage Central login
- A Vendor Express login
- You can request an invitation to represent a vendor
- A Kindle Direct Publishing (KDP) account
Tip: Vendor Express will typically be the easiest and most direct method of accessing AMS for most Amazon Merchants.
Amazon Sponsored Brands Ads
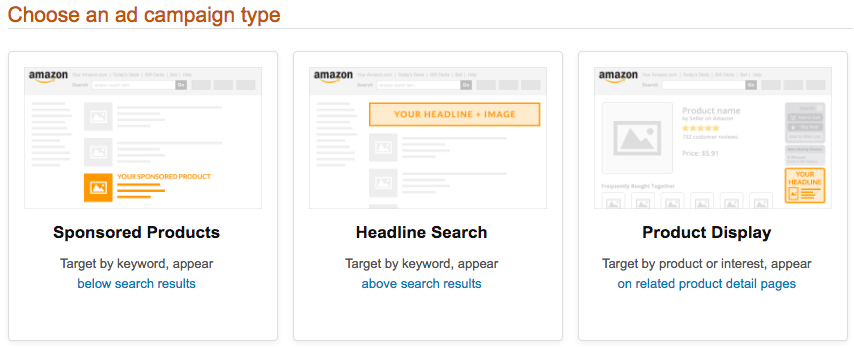
Once you have access to AMS, you can create an Amazon Sponsored Brands Ad. Inside of AMS, navigate to Advertising at the top and you’ll be presented with the ad template builder. You will see three ad templates. For this post, I’m going to pick the Sponsored Brands option in the middle.
Once you’ve selected the Sponsored Brands option, you’ll go to the next page where you can select where you want shoppers to go when they click on your ad. Here, you can select Create a page, Your Amazon Page and Custom URL. The Create a Page option lets you promote up to three ASINs and then direct shoppers to a simple Amazon-built landing page where shoppers can then go to each product’s’ detail page. You will need to add each ASIN individually here. The Your Amazon Page option only lets you add a single ASIN.
Below the Choose your campaign settings link is where you can name your campaign so it is identifiable on the backend. From here, you are able to set your budget on a per day and campaign lifetime basis. Keep in mind that the minimum budget allotment is $100. The last thing you need to do in this section is to determine the duration of your campaign. Once the campaign has been approved, you can choose to let the campaign run until you stop it. The other option is to select a specific date range. This is a great option if you have a limited amount of money to spend.
Keywords and Bids
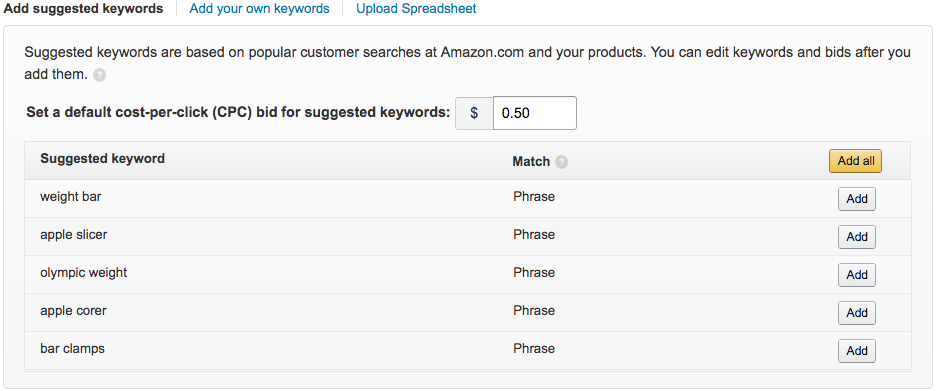
The next section, Add keywords and bids, is where you will add keywords and decide on your bids for the auction. Amazon recommends starting with 30 to 40 keywords no longer than 1 to 2 words per keyword. You have the option to add Amazon-suggested keywords based off of high, medium and low traffic scores. But I recommend using the keywords you know will give you the traffic you desire. From here you will need to set the default cost-per-click bid, Amazon suggests $0.50. Using this method will only allow you to set the target match type as Phrase. You can also add your own keywords by adding them separated by lines or by uploading a spreadsheet. The manual upload method offers you increased flexibility by adjusting the target match type to either Phrase or Exact. Keep in mind that you’ll probably want to adjust your bid according to traffic volume for each keyword. Your Sponsored Brands Ad will display depending on your bid. Ads that appear on page one of a search engine results page are those that have won the highest bid.
Once you’ve settled on the right keywords and bids, you can now create your ad. Amazon provides some great guidelines to improve an ad’s success.
- Use words like “exclusive” and “new” within the copy.
- Use actionable phrases like “Buy Now” and “Save Now”.
- All claims must appear in the product detail page.
- Don’t use unsupported claims like “#1” or “Best Seller”.
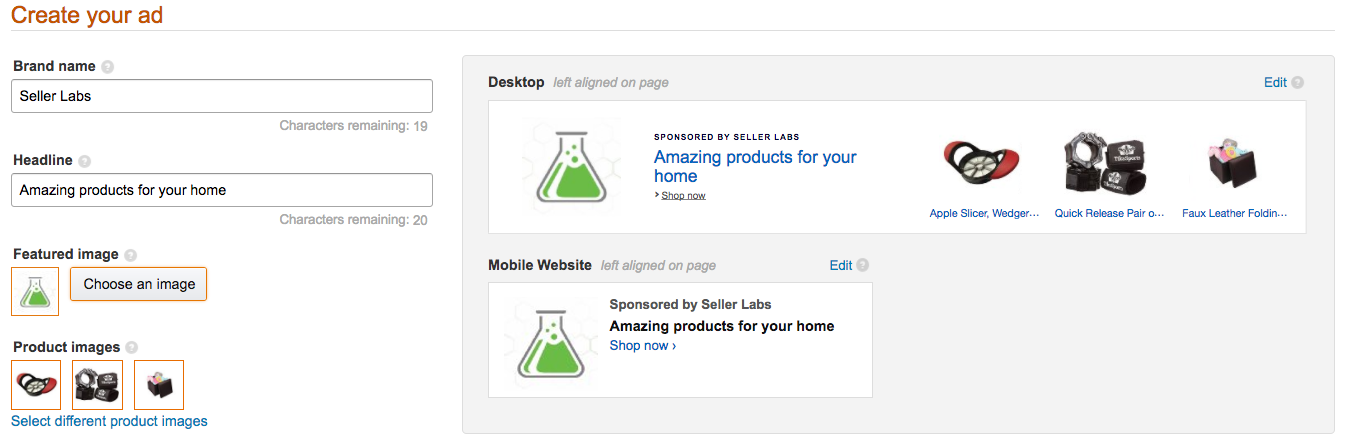
You can update the featured image and product images too for added impact. Once you’re pleased with your banner ad, you can save it or submit the campaign for review.
If you followed Amazon’s instructions, your ad shouldn’t take more than 24 hours to get approved.
Sponsored Brands Ads vs Sponsored Products Ads
Now let’s compare the effectiveness of a Sponsored Brands Ad versus an Amazon Sponsored Products ad, which both advertised the same product. Both ads ran for 5 months. The budgets for each ad were roughly the same—be aware that Sponsored Brands Ads do cost a little more than Sponsored Products Ads.
The results are interesting. The Sponsored Brands Ad received more than double the number of impressions. This isn’t surprising, considering it appears at the top of the search engine results page for high and medium traffic keywords. The number of clicks for the Sponsored Brands Ad matches what you’d expect for a banner ad targeting high traffic volume keywords. The Sponsored Brands ad had nearly double the number of impressions of the Amazon Sponsored Products ad. With nearly 5,000 clicks on the Sponsored Brands ad, the 157 clicks on the Sponsored Products ad is almost laughable. The amount of spend, though, was significantly higher for the Sponsored Brands ad. It ran until its budget hit the limit, whereas, the Amazon Sponsored Products Ad was far from reaching the $5,000 threshold with just $79 spent overall.
The takeaway of the Two
Sponsored Brands Ads are extremely effective but they are expensive. I would use these kinds of ads when launching a new product, trying to meet sales goals, or around popular shopping times (Black Friday, Cyber Monday, Christmas, Prime Day, etc). If you have thousands of dollars to dedicate toward your ad and marketing budget, Sponsored Brands Ads are a no brainer.
| Sponsored Brands Ad | Amazon Sponsored Products Ad | |
| Dates | 5 months | 5 months |
| Budget | $5,000 ~$33/day | $25/day |
| Impressions | 980,050 | 455,605 |
| Clicks | 4,871 | 157 |
| aCPC | $0.97 | $1.98 |
| Spend | $4,998.33 | $79 |
| Total Sales | $15,010.34 | $303.40 |
| ACoS | 33.30% | 26.07% |
Amazon Sponsored Products Ads are effective but should be used for the long-game, like in a drip campaign strategy. From the results, it’s clear to see that these ads are effective but they require more time to achieve any sort of substantial results.
Use Scope to Maximize Your Ads
Now that you know more about Sponsored Brands Ads, it’s time to maximize their effectiveness. Instead of letting Amazon select your keywords, you can use top performing keywords that will get your ad noticed more. How? Using Scope.
Once you’ve downloaded Scope, you’re ready to start doing keyword research. A good place to start is with your own detail pages. This will give you an idea as to what keywords you rank best for. Then you can cross reference your results with those of the leading competitor. Do this several times with different products and you’ll start to put together a fairly comprehensive picture of the best keywords you need to run ads for.
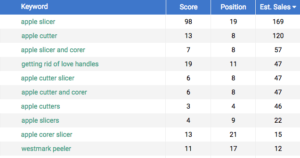
Scope Keyword Research Example
Product 1
Product 2
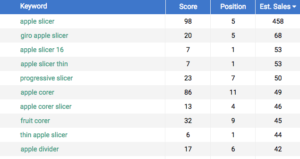
From this small sample size, you can see similar and different keywords for each product. Keywords with a higher score are more valuable. Both Apple slicer and apple corer rank high for both products. But you can see corer slicer, progressive slicer, giro slicer, fruit corer and apple cutter are all great keywords that you could run ads for. Again, I would do keyword research on at least 10 competing products in order to get a large list of potential keywords.
Final Thoughts
Once you’ve settled on 30-40 keywords, you can now add them to your Sponsored Brands Ad. Let your ad run for at least two weeks to collect enough data so you can draw conclusions as to what is working and what is not. If done right, you should get ACoS percentages below 30 percent, even 15 percent.
Maria is an SEO Content Specialist at Seller Labs. Once captured by digital and content marketing in her student days, she keeps living and breathing it ever since.


